
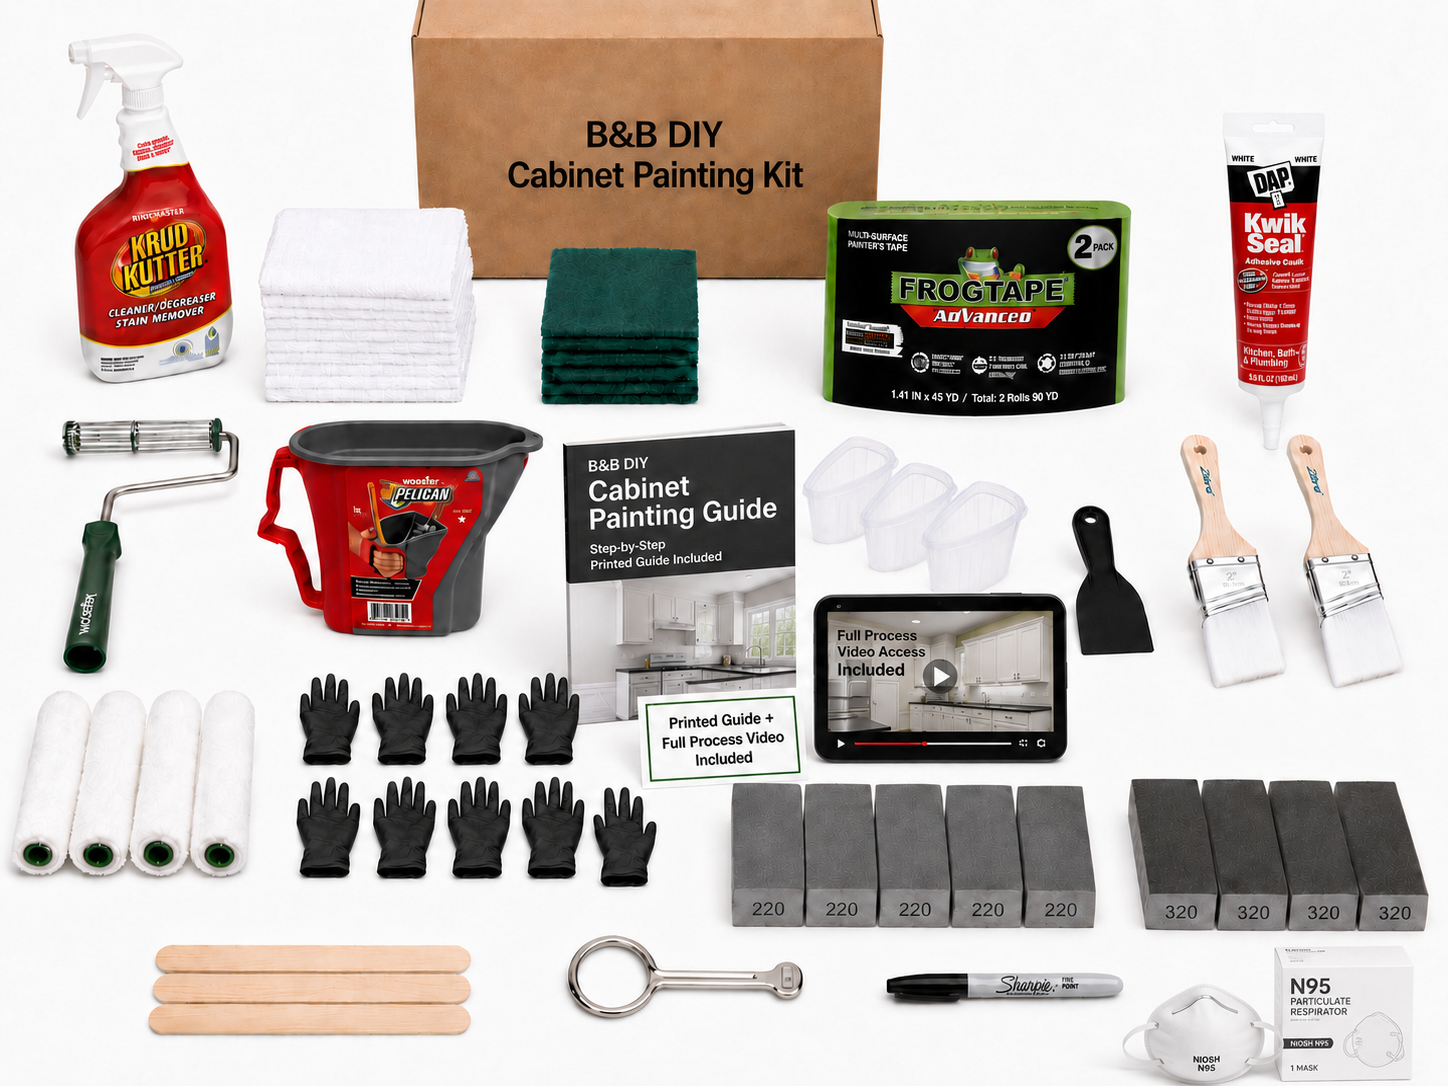
B&B DIY Cabinet Painting Kit
Professional Products. Exact Quantities. Step-by-Step Instruction.
Real products tested by professional painters, portioned for one kitchen, with step-by-step instruction that gives you the best possible pro-level result — without buying a $1,500+ spray setup like we use on our service side.
Optional add-ons
Only if your project needs them.
DAP Plastic Wood-X Wood Filler
$6.99For repairing dents, scratches, gouges, and old hardware holes before priming. Use with the kit's included putty knife and 220-grit sanding sponge.
Cabinet Hardware Installation Jig
$19.99Upgrading handles or knobs? This drilling template lines everything up for straight, consistent hardware placement on doors and drawers. Drill/driver required.
- Free shipping to 48 states
- Contractor-tested
- One-kitchen portions
Free shipping to the 48 contiguous U.S. states. Alaska and Hawaii excluded — contact us for a shipping quote.
Why I Made This Kit
Before you scroll any further — a short video on why I built this kit and what it will help you accomplish.
You get the process, not just the products.
Every kit ships with the researched supplies, a printed step-by-step manual, and a full 53-minute private video walking you through every step. As soon as your purchase is complete, Jackson texts you the video link from his personal phone — so you can start watching while your kit is on its way. Direct 1-on-1 guidance by text, call, or FaceTime is available while you work.
Printed manual
A step-by-step guide in the box so you always know what comes next.
Full 53-minute video
A private, start-to-finish walkthrough covering every step and detail — texted to you immediately after purchase so you can watch before your kit arrives.
1-on-1 guidance
Text, call, or FaceTime Jackson directly when questions come up during your project.
SAVE THOUSANDS. DO IT THE RIGHT WAY.
Hire a Professional
- Typical professional cabinet painting cost: $2,000–$7,000+
- Higher cost depending on kitchen size and scope
B&B DIY Cabinet Painting System
- $299.99 kit with free shipping to 48 states
- Paint and primer purchased separately/local
- Professional-selected tools and supplies
- Printed step-by-step guide
- Full-process video instruction
- Exact paint and primer recommendations
- B&B project support
Potential savings: THOUSANDS
Get the products, process, and instruction to do it yourself — without guessing your way through the project.
Buy the Kit — $299.99Everything for prep and application.
Paint and primer are not included. Every kit ships with recommendations explaining exactly which coatings to purchase locally.
From someone who paints cabinets for a living.
B&B Wood Coatings professionally refinishes cabinets in Lexington and across the Bluegrass — and on the service side, we spray doors and drawer fronts for a factory-grade finish. A surprising amount of our work is repairing or completely redoing cabinets that homeowners painted themselves.
Almost every time, the problem is the same: the wrong degreaser, no shellac-based bonding primer, a cheap roller that left texture, or a "cabinet paint" that never cured hard. The effort was there — the products and process weren't.
This kit exists so DIYers start with the proper products and the proper order of operations from day one. It is not the exact spray process we run on our own jobs, but it is the best possible brush-and-roll path to a durable, professional-looking finish — without a $1,500+ spray setup.
The value is in the research.
- Every product has been tested side-by-side. We tried multiple roller covers, brushes, primers, and paints to find the combination that delivers the best pro-level result with a brush-and-roll technique.
- The kit includes a printed step-by-step manual in the box, so you have the process in your hands while you work.
- Your purchase includes a full 53-minute private video walking you through every step. As soon as your order is complete, Jackson texts you the video link from his personal phone — plus a digital copy of the printed guide — so you can start learning while your kit ships.
- Direct access to Jackson by text, call, or FaceTime when questions come up during your project.
Follow the order. Get the finish.
- 01
Clean / Degrease
Every surface gets degreased twice. Kitchen grease is the #1 reason DIY paint jobs fail.
- 02
Disassemble & Label
Doors, drawers, and hardware come off and get numbered so everything goes back where it belongs.
- 03
Mask & Prep
Counters, floors, walls, and appliances are masked off so you can work fast without worrying about drips.
- 04
Sand
Scuff sand to dull the existing finish and give the primer something to grab.
- 05
Prime
Apply Zinsser BIN Shellac Primer. It locks to the old finish, blocks tannin bleed-through on oak and cherry, and gives the topcoat a solid base.
- 06
Sand Primer
A light sanding of the primer is what gives the topcoat that smooth, factory feel.
- 07
Apply Finish Coats
Two thin coats of a cabinet-grade enamel — thin coats level out, thick coats sag.
- 08
Reassemble
Let it cure, reinstall doors and drawers using your labels, and install hardware.
Optional steps — only if your project calls for them.
Not every kitchen needs these, but if you're dealing with damage or want to upgrade your hardware, here's exactly how to handle it.
Repair Dents & Scratches
Got dents, scratches, or gouges? Before priming, press wood filler into the damage using the included putty knife, let it dry, and sand it flush with your 220-grit sanding sponge. Deep damage may need two thin coats, sanding between each. Wood filler isn't in the kit — grab the DAP Plastic Wood-X add-on with your kit for $6.99.
Upgrade Handles & Knobs
Upgrading hardware? If your new handles don't line up with the old holes, fill them with wood filler or a glued-in dowel, sand flush, prime, and paint. A drill/driver makes the new holes, and a cabinet hardware jig makes alignment easy. Grab the hardware jig add-on with your kit for $19.99.
Common questions.
Does the kit include paint?+
No. Paint and primer are not included. For the top coat, we recommend Sherwin-Williams Emerald Urethane Trim Enamel, tinted to your color choice at your local Sherwin-Williams store. A typical kitchen needs one gallon of paint for 2–3 finish coats.
Does the kit include primer?+
No. Primer is not included for the same reason as paint — we want you to buy fresh product locally. We recommend Zinsser BIN Shellac Primer, available at Lowe's and Home Depot. A typical kitchen needs one gallon for 1–2 coats.
How large of a kitchen will one kit handle?+
One kit is portioned for a typical kitchen of roughly 20–30 doors and drawer fronts. Very large kitchens, islands with paneling, or built-ins may need a second kit or replacement consumables.
Do I need a paint sprayer?+
No. The kit is built around a brush-and-roll process using fine-finish rollers that leave minimal texture. If you own a sprayer, the same prep steps apply and you'll get an even smoother result.
Can I complete the project using a brush and roller?+
Yes — that's what the kit is designed for. The included fine-finish microfiber rollers and angled brush are what we recommend to homeowners who don't want to buy or learn a sprayer.
What paint and primer should I purchase?+
We recommend Zinsser BIN Shellac Primer (found at Lowe's and Home Depot) and Sherwin-Williams Emerald Urethane Trim Enamel, tinted to your color choice at your local Sherwin-Williams store. A typical kitchen needs one gallon of primer and one gallon of paint to complete 1–2 coats of primer and 2–3 coats of paint.
How long does the process take?+
Plan on a long weekend to a full week depending on kitchen size and dry times. Most homeowners spend 2 days on cleaning, disassembly, and prep, then 2–4 days on priming, sanding, and finish coats.
Is this suitable for previously painted cabinets?+
Yes, as long as the existing paint is well-adhered. Peeling or chipping paint must be sanded back to a sound surface first. If a previous DIY job has failed badly, our professional refinishing service may be the better route.
How do I fill dents and scratches before painting?+
This is an optional step for cabinets with damage. After cleaning and sanding, press wood filler into any dents, scratches, or gouges using the kit's included putty knife, let it dry, then sand the repair flush with a 220-grit sanding sponge before priming. Wood filler is not included in the kit — we offer the DAP Plastic Wood-X Wood Filler as an optional $6.99 add-on with your kit purchase.
Can I upgrade handles and knobs, and how do I fill the old holes?+
Yes — another optional step. If your new hardware doesn't line up with the old holes, fill them with wood filler or a glued-in dowel, sand flush with a 220-grit sanding sponge, prime, and paint. A drill/driver is needed to make new holes, and a cabinet hardware jig makes alignment much easier. We offer a Cabinet Hardware Installation Jig as an optional $19.99 add-on with your kit purchase.
Not Ready to Buy Yet?
Get our free step-by-step DIY Cabinet Painting Guide and learn the full cabinet painting process from cleaning and prep through priming, painting, drying and reassembly.
GET THE FREE GUIDEFree download. Practical cabinet painting help from B&B Wood Coatings.
Ready to do it right?
Add the kit to your cart, or let us handle it — our 5–7 day professional service comes with a 7-year no-chip warranty.